Although capillary action basically is the magic behind ensuring proper filler metal distribution into a joint, six basic steps also are necessary to make sure that the design and engineering of the joint helps lead to a good brazed joint.
Step 4: Assemble for brazing.
Once your parts are cleaned and fluxed, hold them in position for brazing. Be sure they remain in correct alignment during the heating and cooling cycles so that capillary action can do its job. If the shape and weight of the parts permit, the simplest way to hold them together is by gravity.
You also can aid gravity by adding extra weight as long as you don't add too much. If you add too much weight, your clearances may not be maintained, and the brazing filler metal may be forced out of the joint area. Also remember that adding weight to the parts increases their mass, and that will increase the time required to raise the parts to the brazing temperature.
Step 5: Braze the assembly.
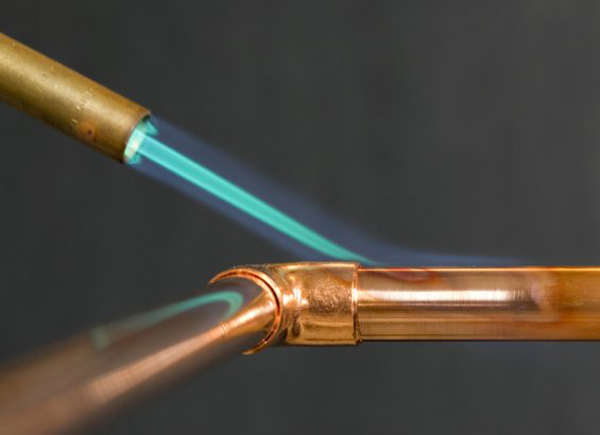
The actual brazing involves heating the assembly to brazing temperature and flowing the filler metal through the joint. Be sure when you're heating an assembly to brazing temperature that you don't heat it to the base materials' melting point.
First, the heating process: In brazing, apply heat broadly to the base metals. If you're brazing a small assembly, you may heat the entire assembly to the flow point of the brazing filler metal. If you're brazing a large assembly, heat a broad area around the joint. A hand-held torch most commonly is used to braze a single assembly. A variety of fuels—natural gas, acetylene, propane, propylene—can be combusted with either oxygen or air. Keep in mind that both metals in the assembly should be heated as uniformly as possible so they reach brazing temperature at the same time. Keep the torch moving at all times, and do not heat the braze area directly.
To prevent uneven heating, watch the flux. If its appearance changes uniformly, the parts are being heated evenly.
Once you've heated the assembly to brazing temperature, you're ready to deposit the filler metal. In manual brazing, carefully hold the rod or wire against the joint area. The heated assembly will melt off a portion of the filler metal, which will be drawn instantly by capillary action throughout the entire joint area. You may want to add some flux to the end of the filler metal rod—about 2 to 3 inches—to improve the flow. You can add flux either by brushing it on or dipping the rod in flux. On larger parts that require longer heating time, or if the flux has become saturated with oxide, adding fresh flux on the filler metal will help improve the flow and penetration of the filler metal into the joint area.
Be cautious: Molten brazing filler metal tends to flow toward areas of higher temperature. In the heated assembly, the outer base metal surfaces may be slightly hotter than the interior joint surfaces. Take care to deposit the filler metal immediately adjacent the joint. If you deposit it away from the joint, it will tend to plate over the hot surfaces rather than flow into the joint. It's also best to heat the side of the assembly opposite the point where you are feeding the filler metal. The filler metal will have a tendency to follow where the heat is most intense.
Step 6: Clean the brazed joint.
After you braze the assembly, clean it. Because most brazing fluxes are corrosive, cleaning is essential. Cleaning usually is a two-step operation:
Remove the flux residues.
Remove any oxide scale formed during the brazing process by pickling.
Because most brazing fluxes are water-soluble, you can remove residues by quenching the assembly in hot water (120 degrees F or hotter). Immerse the assembly while it's still hot, but make sure that the filler metal has solidified completely before quenching. The glasslike flux residues usually will crack and flake off. If they're a little stubborn, brush them lightly with a wire brush while the assembly is still in the hot water.
You may have trouble removing flux if you haven't used enough to begin with, or if you overheated the parts during brazing. Then the flux becomes totally saturated with oxides, usually turning green or black. In this case, the flux has to be removed by a mild acid solution.
After you've gotten rid of the flux, use a pickling solution to remove any oxides that remain on areas that were unprotected by flux during the brazing process. Generally, the best pickle liquor to use will be recommended by the manufacturer of the brazing materials you're using.


 sales@welding-material.com


